〔筆記〕React Native iOS使用 react-native-maps 套件錯誤修正心得step by step #airbnb
因為最近在做新專案,需要用到React Native來開發,
專案需要串Google Maps API for iOS & Android ,
在開發上遇到一些問題寫在這邊筆記一下!
預設大家會已經會建一個新的React Native的 APP了
(官方都有教學一步一步做很簡單)附上連結↓
https://facebook.github.io/react-native/docs/getting-started.html
地圖使用的是RN官方推薦的第三方套件:react-native-maps
STEP.1 創一個新的專案 (如果有已經有專案者可忽略)
react-native init ProjectName  #創建一個專案
cd ProjectName  #進入專案目錄裡
yarn add react-native-maps  #安裝react-native-maps package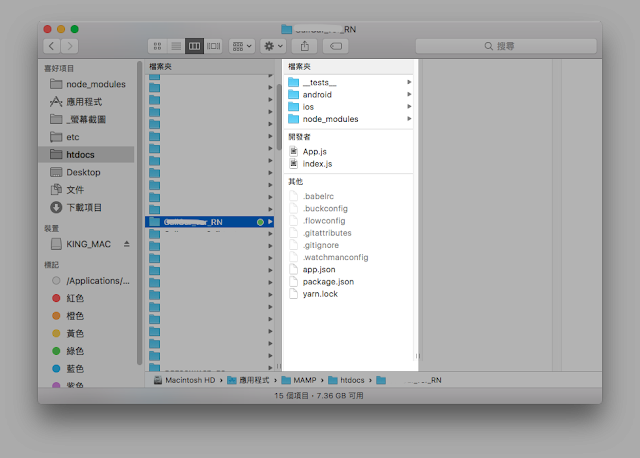
〈做到這邊資料架構大概長成這樣,專案部分馬賽克...敬請見諒....Orz〉
STEP.2 設定iOS的專案
1.先確定環境
這邊很重要!(
首先先確定你裝 Cocoapods 這個管理套件了沒 ←(沒有的請先安裝)
2.進到iOS目錄裡執行pod init
cd ios
pod init
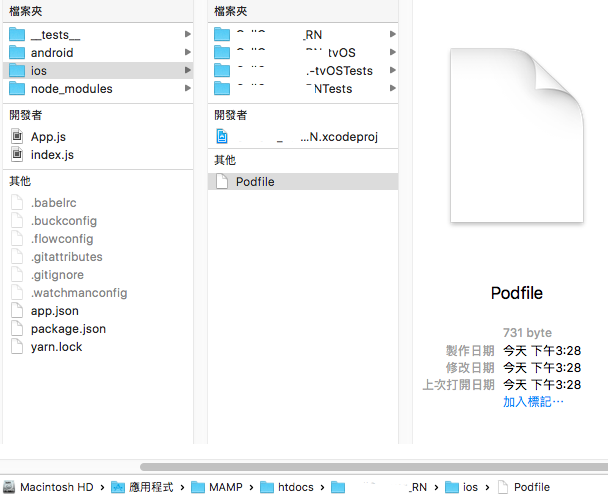
pod安裝完了cli看起來沒事,但其實多出一個檔案
[Podfile]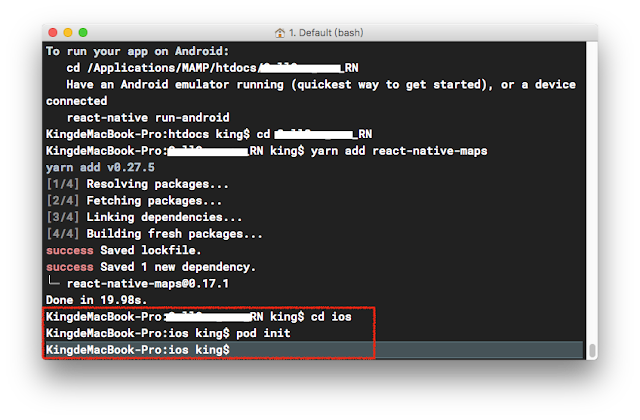
3.打開並編輯Podfile檔(把裡面的Code覆蓋貼上)
# -------------以下開始複製-------------------
# Podfile content
source 'https://github.com/CocoaPods/Specs.git'
platform :ios, '9.0'
target 'ProjectName' do
pod 'yoga', :path => '../node_modules/react-native/ReactCommon/yoga'
pod 'React', path: '../node_modules/react-native', :subspecs => [
'Core',
'RCTActionSheet',
'RCTAnimation',
'RCTGeolocation',
'RCTImage',
'RCTLinkingIOS',
'RCTNetwork',
'RCTSettings',
'RCTText',
'RCTVibration',
'RCTWebSocket',
'BatchedBridge'
]
pod 'GoogleMaps' # <- remove this line if you do not want to support GoogleMaps on iOS
pod 'react-native-maps', path: '../node_modules/react-native-maps/'
pod 'react-native-google-maps', path: '../node_modules/react-native-maps/' # <- if you need GoogleMaps support on iOS
end
post_install do |installer|
installer.pods_project.targets.each do |target|
if target.name == "react-native-google-maps"
target.build_configurations.each do |config|
config.build_settings['CLANG_ENABLE_MODULES'] = 'No'
end
end
end
end
# ---------------停-------------------
存檔(等等會講官方的文檔錯在哪裡....
4.安裝Podfile
在一樣目錄底下下指令
pod install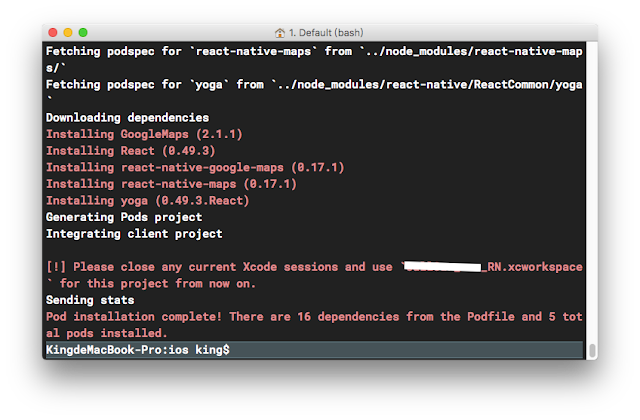
〈Podfile安裝好會長這樣〉
〈ios資料夾裡會多一個Pods的資料夾〉
5.設定Xcode相關變數
開啟 "ProjectName.xcworkspace"
特別注意,副檔名是「.xcworkspace」的檔喔!(重要
找到
然後把
找到
Build Settings > Header Search Path 後雙擊欄位增加$(SRCROOT)/../node_modules/react-native-maps/lib/ios/AirMap然後把
non-recursive 改成 recursive去 Google Console 選擇 Google Map SDK for iOS 啟動金鑰,這邊就不多闡述了。(
啟動之後複製你的金鑰,打開編輯
AppDelegate.m按照圖的位置加上
@import GoogleMaps;和
[GMSServices provideAPIKey:@"YOUR_KEY"];這兩排指令
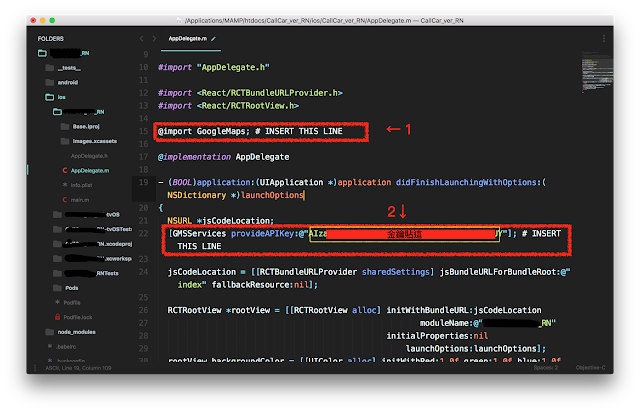
好啦~存檔後差不多就設定完了
cli 下
react-native run-ios他就會一直跑,喝個水、去上個廁所吧~身體健康也要顧一下XD
回來之後,他也跑完了當然不會那麼順利就Success啦....報錯了...
-------------------------------------------
報錯一:
解決:Command failed: /usr/libexec/PlistBuddy -c Print:CFBundleIdentifier build/Build/Products/Debug-iphonesimulator/CallCar_ver_RN.app/Info.plistPrint: Entry, ":CFBundleIdentifier", Does Not Exist
可以參考這一篇
[Master Task] Print: Entry, ":CFBundleIdentifier", Does Not Exist #14423
-------------------------------------------
Apple Mach-O Linker Error Group
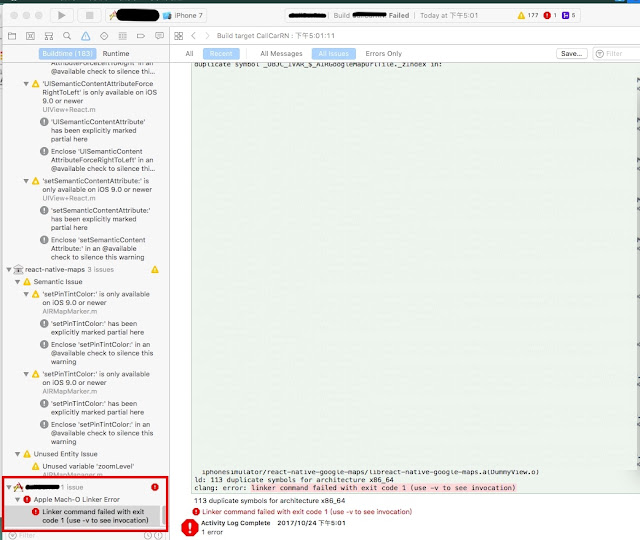
解決:
先下
react-native unlink react-native-maps 一次再下
react-native link react-native-maps 讓他重新連結套件手動打開
ProjectName.xcworkspace 把 "General"裡面的相關設定調好後,Generic iOS Device > Run看看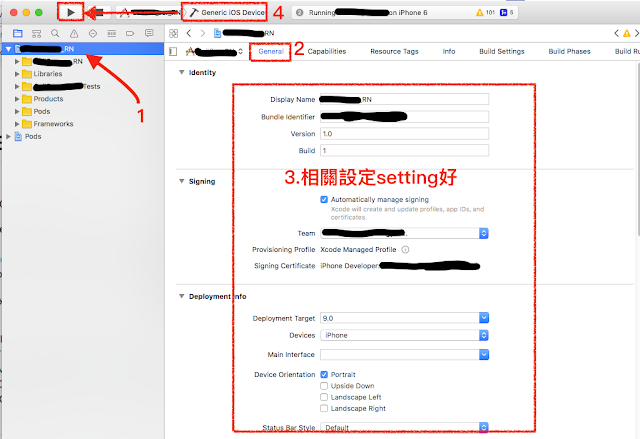
-------------------------------------------
好吧~到這邊我已經卡關四天了.....
希望用血淚換來的經驗可以幫助到大家順利開發TAT
© 圖為 曾英綺 版權所有,請勿盜圖等相關動作
[ 著作權為 Ying-chi Tzeng 曾英綺 所有,轉載請告知 ]
-------------------------------------------
參考資料:.airbnb/react-native-maps
https://github.com/airbnb/react-native-maps
.react-native-maps/docs/installation.md
https://github.com/airbnb/react-native-maps/blob/master/docs/installation.md
.[Master Task] Print: Entry, ":CFBundleIdentifier", Does Not Exist #14423
https://github.com/facebook/react-native/issues/14423
.anhtuank7c/maps-example:
https://github.com/anhtuank7c/maps-example
.React Native Google Map with react-native-maps
https://codeburst.io/react-native-google-map-with-react-native-maps-572e3d3eee14
.React Native
https://facebook.github.io/react-native/
-------------------------------------------


Hey, very nice site. I came across this on Google, and I am stoked that I did. I will definitely be coming back here more often. Wish I could add to the conversation and bring a bit more to the table, but am just taking in as much info as I can at the moment. Thanks for sharing.
回覆刪除React Native Development Company
hi! thanks for your reply and hope it helps. : )
刪除