把遇到錯誤的、學習到的前端筆記在這邊

總網頁瀏覽量

Copyright © Tzeng Ying-chi. 技術提供:Blogger.

2017/10/31

〔筆記〕React Native Android使用 react-native-maps 套件錯誤修正心得 step by step #airbnb


繼上一篇 React Native iOS使用 react-native-maps 套件錯誤修正心得
成功在 iOS 上串好Google Maps SDK for iOS之後......

對!要來做Android了.....Orz
雖然Android本身就有Google的血統,但是也不是那麼好一次就成功的....(嗚嗚TAT

那我們就從官方文檔Android的地方開始說好了....

react-native-maps/docs/installation.md


上次創好專案後,應該會有一個ios 和一個Android的資料夾

現在的環境是

  • 已經run過 "react-native link react-native-maps"了~
  • 使用Genymotion模擬器來測試

在回到官方文檔
-----------------------------------------------
Android 
Step1.
This step is not necessary if you ran "react-native link react-native-maps"
〔如果有執行過link套件的話就不用設定〕

Step2.
This step is not necessary if you ran "react-native link react-native-maps"


想必大家心裡一定跟我想的一樣,哇~這麼爽都不用做直接略過就好了XD
(謎之音:痛苦的還在後頭呢....

Step3.和Step4.看起來都很簡單

Step3. 叫你去Google Maps AP 申請 " for Android " 的金鑰「傳送門」,記得要把API啟動Enable喔!!

打開 android\app\src\main\AndroidManifest.xml 

Copy <mata-data .... />貼在<application>這裡面</application>
然後把你的金鑰貼在android:value裡

-----------------------------------------
<meta-data
  android:name="com.google.android.geo.API_KEY"
  android:value="Your Google maps API Key Here"/>
-----------------------------------------


Step4.確定一些Google Play Services服務安裝了沒

因為我是用Genymotion模擬器去跑的,所以這邊就不講實體機的方法了

好啦~因為我也是第一次用Genymotion去跑安卓程式XD
就衝吧!!
run  react-native run-android

cil也很乖的報"BUILD SUCCESSFUL"
但是看到畫面.....痾......說好的谷哥呢......Orz

就跟人生一樣......事情當然不會那麼順利啦.....
有鑑於iOS卡了四天比較有經驗一點,這次錯誤卡一天而已...就慢慢設定吧...

首先可以參考官方的Troubleshooting


------------------------------------------
問題之一:無法顯示地圖

因為Genymotion模擬器本身沒有安裝Google App相關的設定,所以要手動去下載安裝進來
下載GAPPS選擇Platform x86 → Android 看你 → Variant nano

下載好了直接解壓縮後拖拉進模擬器安裝,接著按照指示步驟完成就好了~
好了之後Genymotion 側邊的GAPP ICON會打綠勾勾,代表OK囉~

------------------------------------------
問題之二:無法連結Genymotion模擬器

在執行react-native run-android常常會報確認模擬器是否啟動了
"Make sure you have an Android emulator running or a device connected and have
set up your Android development environment"
這邊的話還是要回到Genymotion的設定裡

Settings → ADB → 選擇 Use custom Android SDK tools
→Browse 路徑是 /Users/你的用戶名/Library/Android/sdk


------------------------------------------
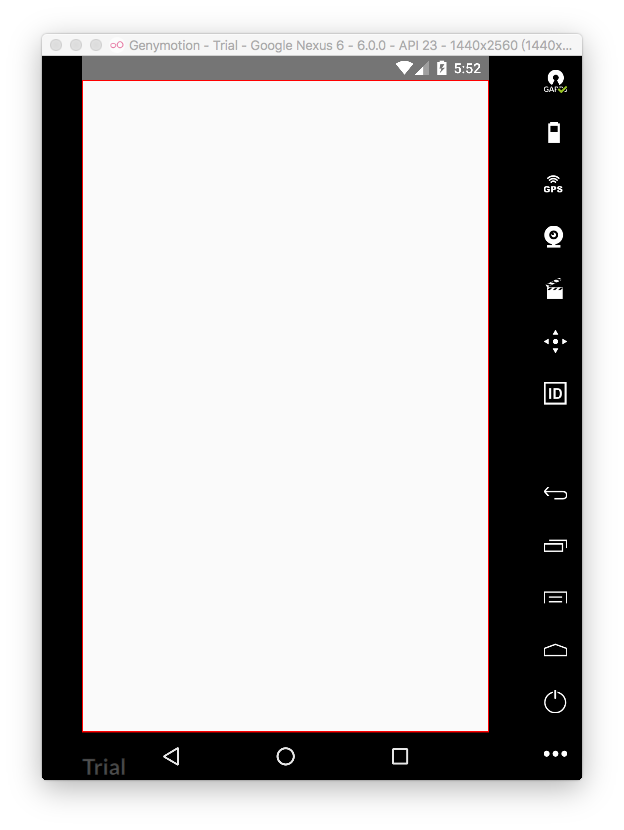
問題之三:開啟地圖會出現紅邊(Red Border)

根據Troubleshooting裡美國大大們的解法

Step1
android目錄裡 打開settings.gradle貼上,
//------------
include ':react-native-maps'
project(':react-native-maps').projectDir = new File(rootProject.projectDir, '../node_modules/react-native-maps/lib/android')
//------------

Step2 (關鍵!!)
-編輯 MainApplication.java
資料夾路徑/專案名稱/android/app/src/main/java/com/專案名稱/MainApplication.java

要import進來MapsPackage
import com.facebook.react.ReactApplication;上方加入

import com.facebook.react.ReactApplication; //<--加入這排

然後

@Override

    protected List<ReactPackage> getPackages() {

      return Arrays.<ReactPackage>asList(

        new MainReactPackage(),

        new MapsPackage() //<--加入這排

      );

    }

都好了之後,重新執行react-native run-android 看看,本人是可以正常顯示了~~


-------------------------------------------

這篇就到此結束囉~

還有很多不足的地方,可以多多去看官方Issues裡面有很多的解決方法,
希望大家開發順利~^^


© 圖為 曾英綺 版權所有,請勿盜圖等相關動作

[ 著作權為 Ying-chi Tzeng 曾英綺 所有,轉載請告知 ]

-------------------------------------------
參考資料:

.React Native設定Android開發環境 - macOS與Windows
http://eddychang.me/blog/javascript/95-react-native-android-macos-windows.html

.Map can not show on Android #684
https://github.com/airbnb/react-native-maps/issues/684

.[教學] React Native for Android - 1: 基礎
-------------------------------------------

2017/10/25

〔筆記〕React Native iOS使用 react-native-maps 套件錯誤修正心得step by step #airbnb


因為最近在做新專案,需要用到React Native來開發,
專案需要串Google Maps API for iOS & Android ,
在開發上遇到一些問題寫在這邊筆記一下!

預設大家會已經會建一個新的React Native的 APP了

(官方都有教學一步一步做很簡單)附上連結↓
https://facebook.github.io/react-native/docs/getting-started.html

在這邊我使用的是「Building Projects with Native Code」的教學


地圖使用的是RN官方推薦的第三方套件:react-native-maps

STEP.1 創一個新的專案 (如果有已經有專案者可忽略)

react-native init ProjectName  #創建一個專案
cd ProjectName  #進入專案目錄裡
yarn add react-native-maps  #安裝react-native-maps package


〈做到這邊資料架構大概長成這樣,專案部分馬賽克...敬請見諒....Orz〉


STEP.2 設定iOS的專案

1.先確定環境
這邊很重要!(因為我就是在這裡出錯的XD

首先先確定你裝 Cocoapods 這個管理套件了沒 ←(沒有的請先安裝)

2.進到iOS目錄裡執行pod init

cd ios
pod init


pod安裝完了cli看起來沒事,但其實多出一個檔案 [Podfile]


3.打開並編輯Podfile檔(把裡面的Code覆蓋貼上)

# -------------以下開始複製-------------------

# Podfile content
source 'https://github.com/CocoaPods/Specs.git'

platform :ios, '9.0'

target 'ProjectName' do
    pod 'yoga', :path => '../node_modules/react-native/ReactCommon/yoga'
    pod 'React', path: '../node_modules/react-native', :subspecs => [ 
    'Core',
    'RCTActionSheet',
    'RCTAnimation',
    'RCTGeolocation',
    'RCTImage',
    'RCTLinkingIOS',
    'RCTNetwork',
    'RCTSettings',
    'RCTText',
    'RCTVibration',
    'RCTWebSocket',
    'BatchedBridge'
    ] 
 
    pod 'GoogleMaps'  # <- remove this line if you do not want to support GoogleMaps on iOS
    pod 'react-native-maps', path: '../node_modules/react-native-maps/'
    pod 'react-native-google-maps', path: '../node_modules/react-native-maps/'  # <- if you need GoogleMaps support on iOS
 
end
post_install do |installer|
    installer.pods_project.targets.each do |target|
        if target.name == "react-native-google-maps"
            target.build_configurations.each do |config|
                config.build_settings['CLANG_ENABLE_MODULES'] = 'No'
            end
        end
    end
end

# ---------------停-------------------

存檔(等等會講官方的文檔錯在哪裡....

4.安裝Podfile
在一樣目錄底下下指令

pod install


〈Podfile安裝好會長這樣〉
〈ios資料夾裡會多一個Pods的資料夾〉

5.設定Xcode相關變數

開啟 "ProjectName.xcworkspace"
特別注意,副檔名是「.xcworkspace」的檔喔!(重要

找到 Build Settings > Header Search Path 後雙擊欄位增加

$(SRCROOT)/../node_modules/react-native-maps/lib/ios/AirMap

然後把 non-recursive  改成 recursive


6.啟動Google Map SDK for iOS 的API金鑰

Google Console 選擇 Google Map SDK for iOS 啟動金鑰,這邊就不多闡述了。(懶得打XD

啟動之後複製你的金鑰,打開編輯AppDelegate.m
按照圖的位置加上

@import GoogleMaps;


[GMSServices provideAPIKey:@"YOUR_KEY"];

這兩排指令

好啦~存檔後差不多就設定完了
cli 下 react-native run-ios

他就會一直跑,喝個水、去上個廁所吧~身體健康也要顧一下XD


回來之後,他也跑完了當然不會那麼順利就Success啦....報錯了...

-------------------------------------------

報錯一:

Command failed: /usr/libexec/PlistBuddy -c Print:CFBundleIdentifier build/Build/Products/Debug-iphonesimulator/CallCar_ver_RN.app/Info.plist Print: Entry, ":CFBundleIdentifier", Does Not Exist
解決:

可以參考這一篇
[Master Task] Print: Entry, ":CFBundleIdentifier", Does Not Exist #14423

-------------------------------------------

報錯二:

Apple Mach-O Linker Error Group


解決:

先下 react-native unlink react-native-maps 一次
再下 react-native link react-native-maps 讓他重新連結套件

手動打開 ProjectName.xcworkspace 把 "General"裡面的相關設定調好後,
Generic iOS Device > Run看看


-------------------------------------------

好吧~到這邊我已經卡關四天了.....
希望用血淚換來的經驗可以幫助到大家順利開發TAT

© 圖為 曾英綺 版權所有,請勿盜圖等相關動作
[ 著作權為 Ying-chi Tzeng 曾英綺 所有,轉載請告知 ]


-------------------------------------------
參考資料:

.airbnb/react-native-maps

https://github.com/airbnb/react-native-maps

.react-native-maps/docs/installation.md
https://github.com/airbnb/react-native-maps/blob/master/docs/installation.md

.[Master Task] Print: Entry, ":CFBundleIdentifier", Does Not Exist #14423
https://github.com/facebook/react-native/issues/14423

.anhtuank7c/maps-example:
https://github.com/anhtuank7c/maps-example

.React Native Google Map with react-native-maps
https://codeburst.io/react-native-google-map-with-react-native-maps-572e3d3eee14

.React Native
https://facebook.github.io/react-native/
-------------------------------------------

2017/10/19

2017/10/03

〔筆記〕串Firebase API 之隨手筆記


API名稱:onAuthStateChanged
用法:登入後的狀態
範例:

login_btn.addEventListener("click",function(){
  console.log(acc_user_L.value);
  firebase.auth().signInWithEmailAndPassword(acc_user_L.value, psw_user_L.value).catch(function(error) {
    // Handle Errors here.
    console.log(error);
    var errorCode = error.code;
    var errorMessage = error.message;
    console.log(errorMessage);
  })
  firebase.auth().onAuthStateChanged(function(user) {
    console.log(user);    //這裡會印出User的資訊
    if (user) {
      // User is signed in.
    }
  });
},false);


------------------------------------------------------------------------------------

這個API怎麼用勒?


  firebase.auth().onAuthStateChanged(function(user) {←//這邊帳號登入後,登入的狀態產生變化
    console.log(user);
//上圖的firebase.UserInfo#displayName的"UserInfo"就是指function(user){}函式裡的user
//所以官方文件裡就寫firebase.UserInfo可以取User的XXX,指的是配合大函式回傳的東西
    if (user) {
      // User is signed in.
      console.log(user.uid);
      console.log(user.providerId); 
      // console.log(user.email);
      // displayName
      // emailVerified
      // phoneNumber
      // photoURL
      // providerData
    }
  });
},false);